 Guitar Cycles
Guitar Cycles: User Manual
The complete guide to the app
Prefer a printable copy? Use the Download PDF button above — it opens your browser's print dialog, where you can choose “Save as PDF”.
Chapter 1: Getting Started
Starting the app
The first time you open Guitar Cycles, you'll see a welcome screen with the app's logo, the title “Chord Cycles for Guitar” and the subtitle “Voice leading companion”. This screen appears only once: after your first visit, the app takes you straight to the practice screen every time you open it.
From here you have two options:
Start: enters the app directly (tapping the logo does the same thing).
How it works: opens the built-in Help screen first, so you can read a quick overview before diving in. From Help, you can return to this welcome screen if you haven't entered yet.
Rotating your phone to landscape
Guitar Cycles is designed to be used in landscape orientation (turned on its side), so the fretboard and note matrix have enough width to display clearly. The welcome screen is shown in portrait, but as soon as you tap Start, the practice screen locks to landscape. Turn your phone sideways to see it correctly.
The one exception is the Help panel: it follows your phone's orientation, portrait or landscape, so you can read it comfortably in either position.
The first-run tour
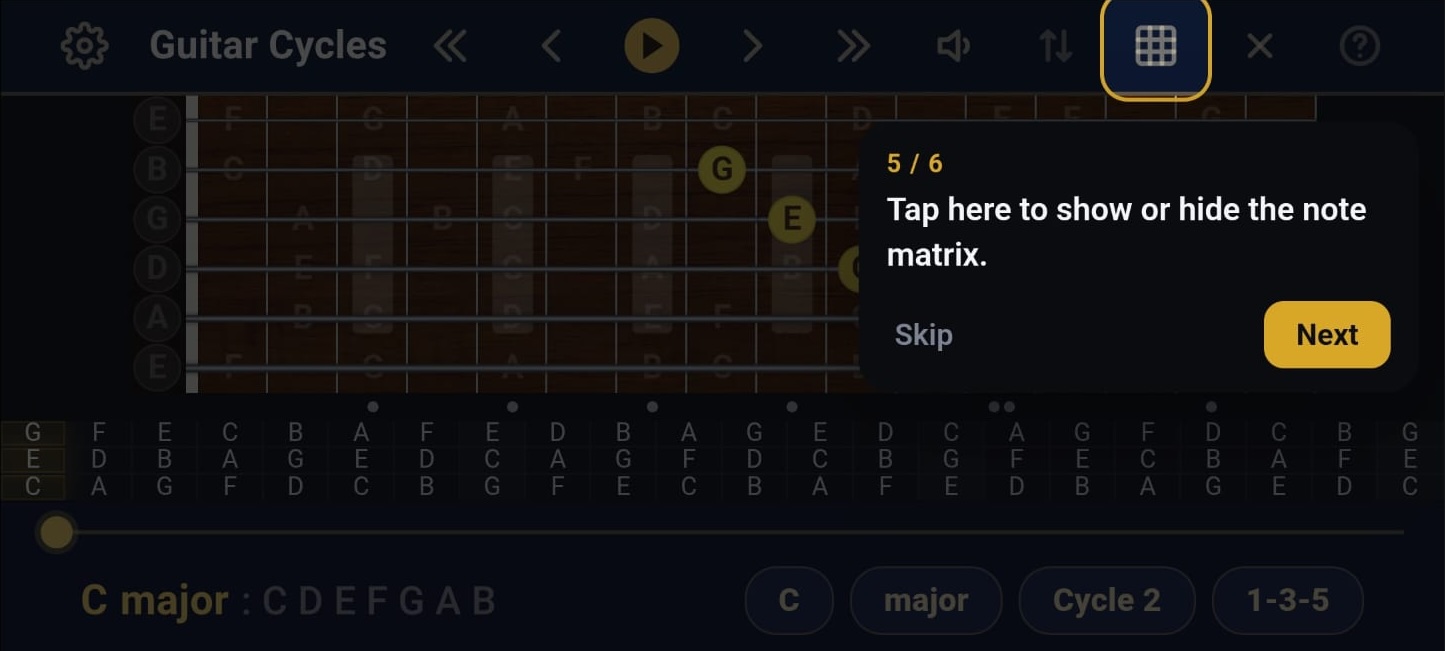
The first time you reach the main practice screen, a short guided tour walks you through the essentials, one highlighted element at a time. Tap Next to move through it, or Skip at any point to dismiss it. Once finished or skipped, it won't appear again.
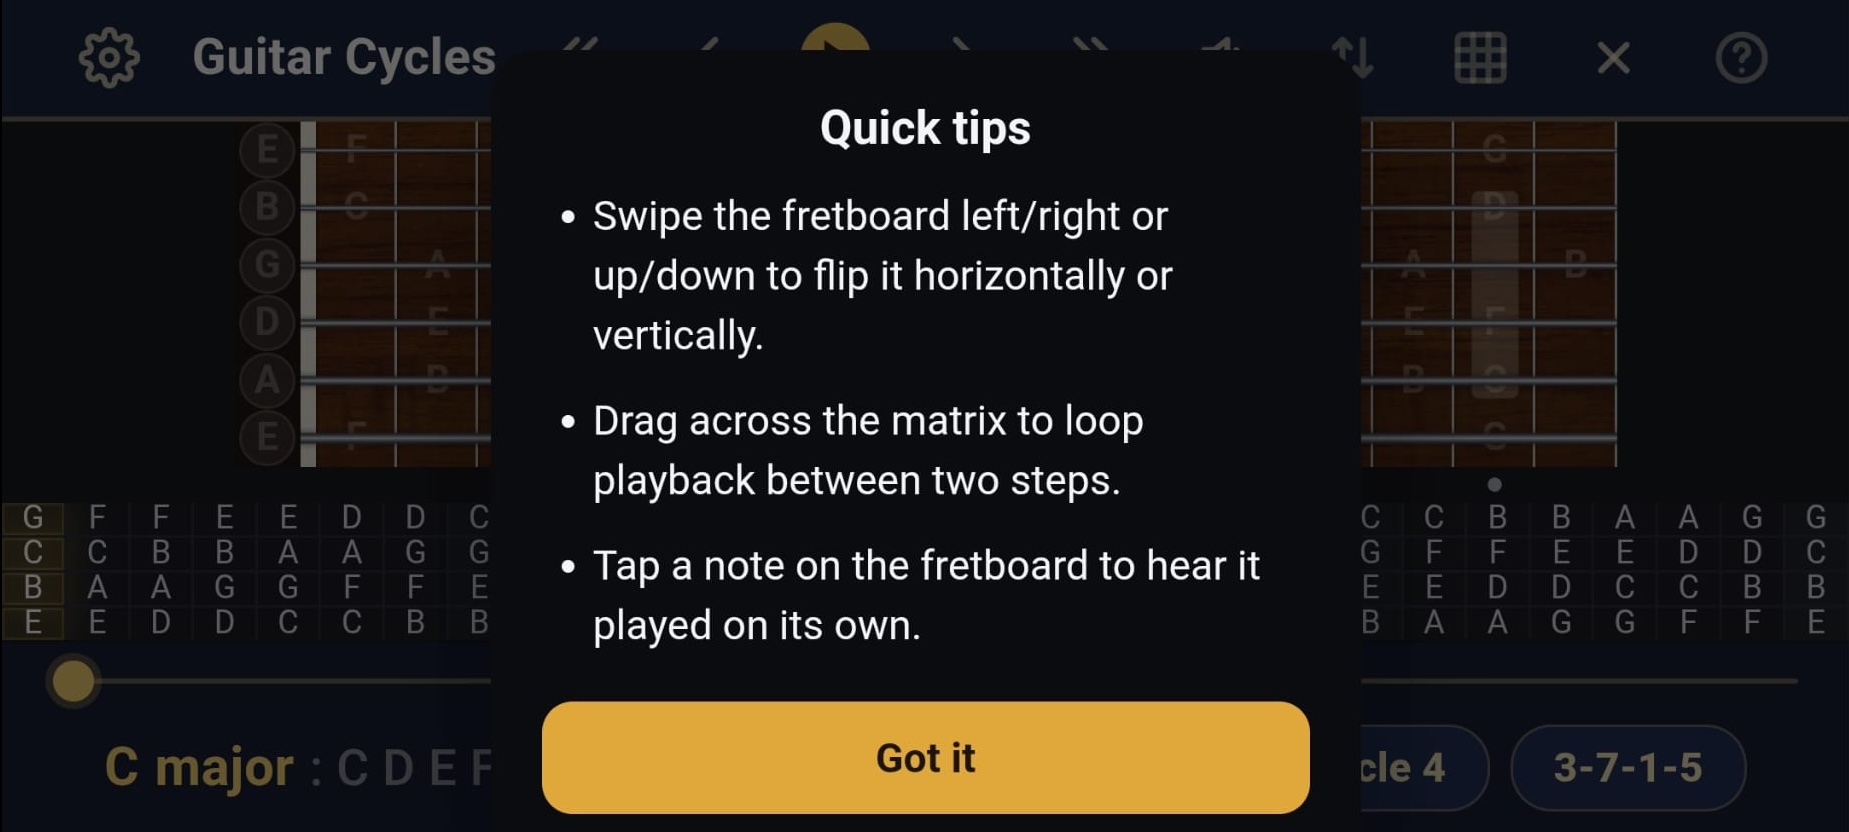
Before the step-by-step tour begins, a separate “Quick tips” popup lists three gestures worth knowing up front (flipping the fretboard, looping with the matrix, tapping a note to hear it on its own); tap Got it to dismiss it and start the tour.
In order, the guided tour covers:
The Key, Scale, Cycle and Voicing chips at the top, where you choose what you're practicing.
The Play button, to start hearing the chord progression.
The fretboard, which lights up to show the notes of each chord as it plays.
The swipe gesture on the fretboard: swipe sideways to flip it left-to-right, or up and down to flip it top-to-bottom.
The show/hide matrix button, which reveals the note matrix under the fretboard.
The tap-and-drag gesture on the matrix, to loop playback over just the section you want to practice.
Chapter 2: The Main Screen
Once past the welcome screen, you land on the main practice screen, the one you'll spend most of your time in. At the top is a single toolbar giving you access to everything: the settings, the real-time information about what you're practicing, the transport controls to play it, and quick toggles for the surrounding view.
The Menu button
The gear icon at the far left opens the Settings drawer, covered in full in Chapter 5. Anything you can adjust in depth (tunings, instruments, playback timing) lives there; the main screen is kept deliberately essential.
The four chips: Key, Scale, Cycle, Voicing
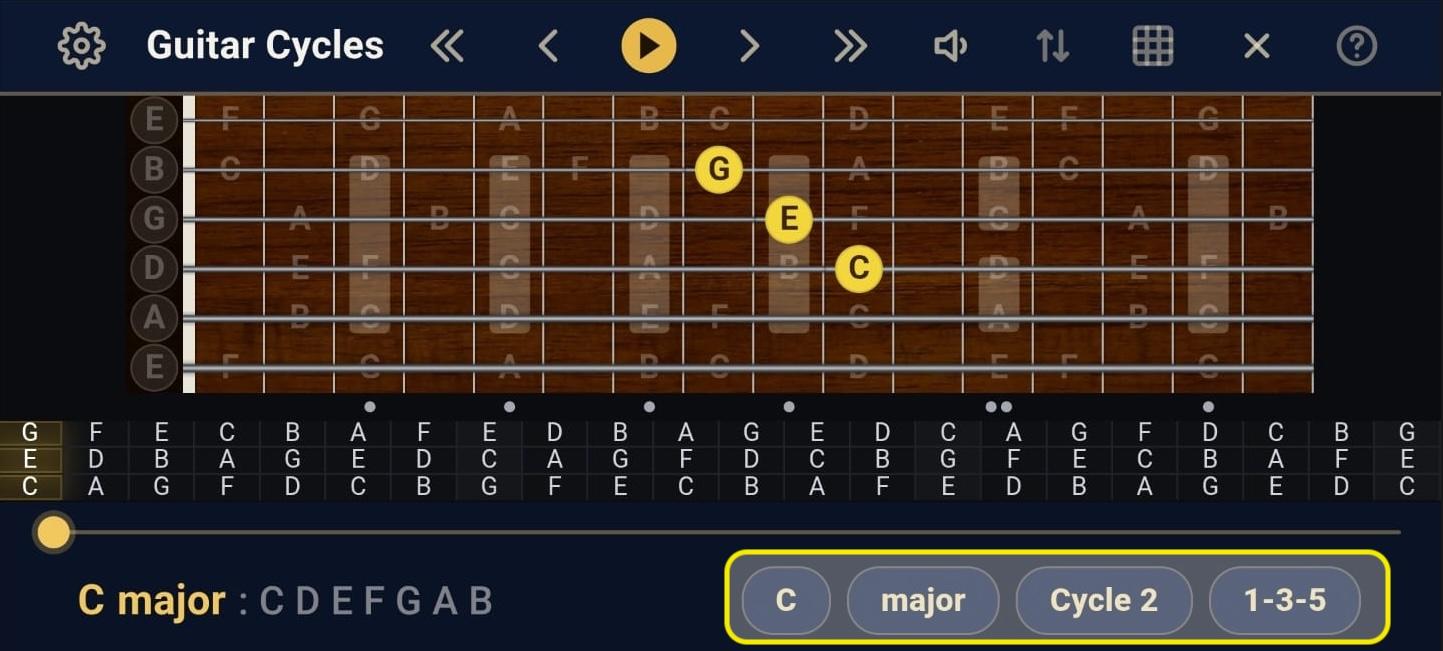
Just right of center sit four small pill-shaped buttons. Each one shows your current choice and, when tapped, opens a list to change it.
Key: the tonal center everything is built on. Tapping opens a list of 21 key names covering all 12 pitches.
Scale: the family of seven notes chords are drawn from. Four choices: Major, Melodic minor, Harmonic minor and Harmonic major.
Cycle: how many scale degrees the progression shifts by. Any size from 1 to 7.
Voicing: the order the chord's notes are stacked in, across whichever strings you've chosen. This list adapts automatically to how many strings are active. With 3 strings active, only two of the six named triad shapes are currently selectable here, Root position and Spread: Quartal, Quartal (inverted), Shell and Shell (inverted) are still defined in the app's catalog, but are temporarily excluded from this picker pending a fix, not removed by design. With 4 strings active, 37 of the 44 tetrad shapes in the catalog are selectable, grouped into eleven families of up to four inversions each: Piano style, Drop 2, Drop 3, Drop 2&3, Drop 2&4, dbl Drop 2&3, sus2, sus 2&4, cluster, Quartal I and Quartal II (a handful of individual inversions within sus2, sus 2&4 and cluster are excluded for the same reason).
NOTE: If you're on the free tier, the Key, Scale and Cycle chips show their full lists with locked options dimmed; tapping a dimmed option opens the purchase screen. The Voicing chip works differently on the free tier: instead of the full catalog, it shows just two choices, “Triad” and “Tetrad”, each applying a complete preset combination in one tap. Chapter 6 explains exactly what's included at each tier.The transport controls
At the center of the toolbar are five buttons controlling playback:
« (double left chevron) jumps to the previous inversion of the current chord: the same notes, rearranged into a different close-position shape elsewhere on the neck. It dims and stops responding when the current cycle size has no other inversion available (Cycle 1, for example).
‹ (single left chevron) steps back one position in the sequence.
Play/Pause: a single tap starts or stops playback. A quick double tap does something slightly different: it stops playback and resets the position to the start of the sequence (or the start of the active loop, if you've set one).
› (single right chevron) steps forward one position.
» (double right chevron) jumps to the next inversion, mirroring the « button.
The toggle icons
Audio on/off mutes or unmutes audio completely, without affecting anything else on screen.
Flip matrix rows mirrors the note matrix vertically, top to bottom.
Show/hide matrix expands or collapses the note matrix panel under the fretboard.
Exit and Help
Exit app closes Guitar Cycles completely. This isn't a “minimize”: the app is removed from your phone's recent-apps list, so you're starting fresh next time you open it (though your settings and progress are always saved). There's no confirmation prompt, so use it deliberately.
Help (?) opens the Help and About panel at any time, covered in Chapter 8.
The Back button (Android)
Your phone's Back button, or the back-swipe gesture, is aware of whatever is currently open, rather than always closing the app outright. If the Settings drawer, a quick picker, the purchase screen, or Help is open, Back closes just that and returns you to the main screen; it only exits Guitar Cycles when none of those is open, matching the same behavior as the Exit app button above.
Chapter 3: The Fretboard
The fretboard is the large panel showing a complete guitar neck, and is where you'll see, and interact with, the actual notes of what you're practicing. It updates live as playback moves through the cycle, and it also responds directly to your taps and swipes.
Reading the fretboard
Every string shows a dot at every fret; a dot is labeled with its note name when it's a natural pitch (C, D, E, F, G, A or B) or when it's part of the current chord, and stays unlabeled otherwise, so the neck doesn't get cluttered with every accidental. The notes making up the current chord (the ones belonging to whichever step of the cycle is currently selected) are highlighted in yellow. As playback advances through the sequence, the yellow highlight moves with it, so you can watch the voicing travel across the neck in real time.
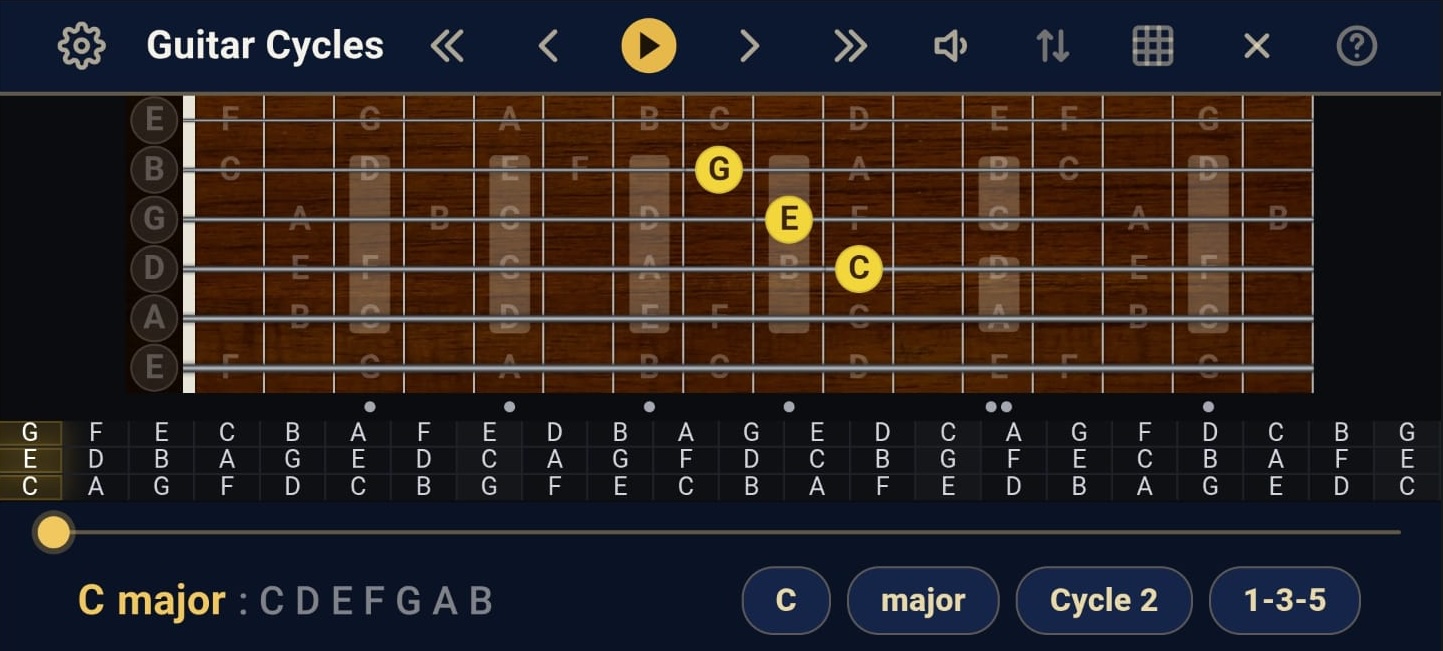
Hearing a single note
Tap any yellow (active) dot to hear that single note on its own, isolated from the rest of the chord. This is useful for checking your ear against a specific tone, or confirming exactly where a note sits.
Choosing which strings are active
Active strings are chosen from Settings: open the Harmony tab (Chapter 5) and use the six tappable string dots there. The fretboard itself is read-only on this point; tapping the nut just plays that open string's sound, the same as tapping any other active dot.
You need at least 3 strings active at all times; the app won't let you go below that.
You can have at most 4 strings active. If you tap a 5th string while 4 are already selected, the app automatically drops the lowest-pitched of the previously selected strings to make room.
Going from 4 strings down to 3 (or back up to 4) doesn't reset your voicing to a generic default. The app remembers the last voicing you had at each string count, so switching back and forth restores exactly what you had before.
Flipping the fretboard
Swipe anywhere on the fretboard to mirror its layout: a horizontal swipe (left or right) flips it left-to-right, which is useful if you'd rather see the low frets on the right instead of the left. A vertical swipe (up or down) flips it top-to-bottom, for example showing the low E string at the top instead of the bottom.
Both flips are purely visual: they change how the neck is drawn, not which notes or strings are active. The same two flips are also available as checkboxes in Settings, under the Fretboard tab, if you'd rather set them there than swipe.
Tapping to step or jump inversions
Tapping anywhere on the fretboard that isn't an active (yellow) dot also moves you through the sequence: tapping the left half steps back one position, tapping the right half steps forward, mirroring the ‹ and › transport buttons. A quick double tap in the same spot jumps to the previous or next inversion instead, mirroring « and ».
Pinch-to-zoom
On Android, pinching with two fingers on the fretboard changes how many frets are shown, the same setting as the Frets slider in Settings (Chapter 5): spreading your fingers apart zooms in to fewer, larger frets (down to a minimum of 9); pinching them together zooms back out.
Chapter 4: The Cycle Matrix
Below the fretboard sits the note matrix, a compact grid showing the whole chord cycle at once rather than just the current step. While the fretboard shows you one moment in detail, the matrix shows you the whole path, so you can see the shape of the progression and jump around freely.
Reading the matrix
Each column represents one step of the cycle; each row represents one of the active voices (one per string in your current set). Reading left to right traces the same sequence the Play button plays: the note names in a given column are exactly what you'll see highlighted on the fretboard when playback reaches that step.
The matrix panel can be shown or hidden with the toggle button in the top bar (Chapter 2), and its rows can be flipped top-to-bottom with the adjacent button, independently of any fretboard flip.
Jumping to a step, creating a loop
Tap any cell to jump directly to that step: the fretboard updates immediately and, if audio is on, you'll hear that chord.
Tap and drag across a range of cells to set a loop: playback repeats back and forth between the first and last step you selected, instead of playing through the whole cycle. This is the tool to reach for when you want to drill one specific transition (say, just the move from one chord to the next) instead of restarting the whole sequence every time.
A couple of details make this feel natural in practice: if playback is running and you tap a step outside the current loop, the app jumps there immediately and stops playback, rather than snapping back into the loop a moment later, which would just be confusing. Tapping inside the loop, on the other hand, doesn't interrupt it. When you're done with a loop, a double tap anywhere inside it clears it; a single tap in the same spot still jumps there as usual (with a brief pause to distinguish it from a double tap). You don't lose the ability to navigate within the loop; you just get an extra gesture for clearing it entirely.
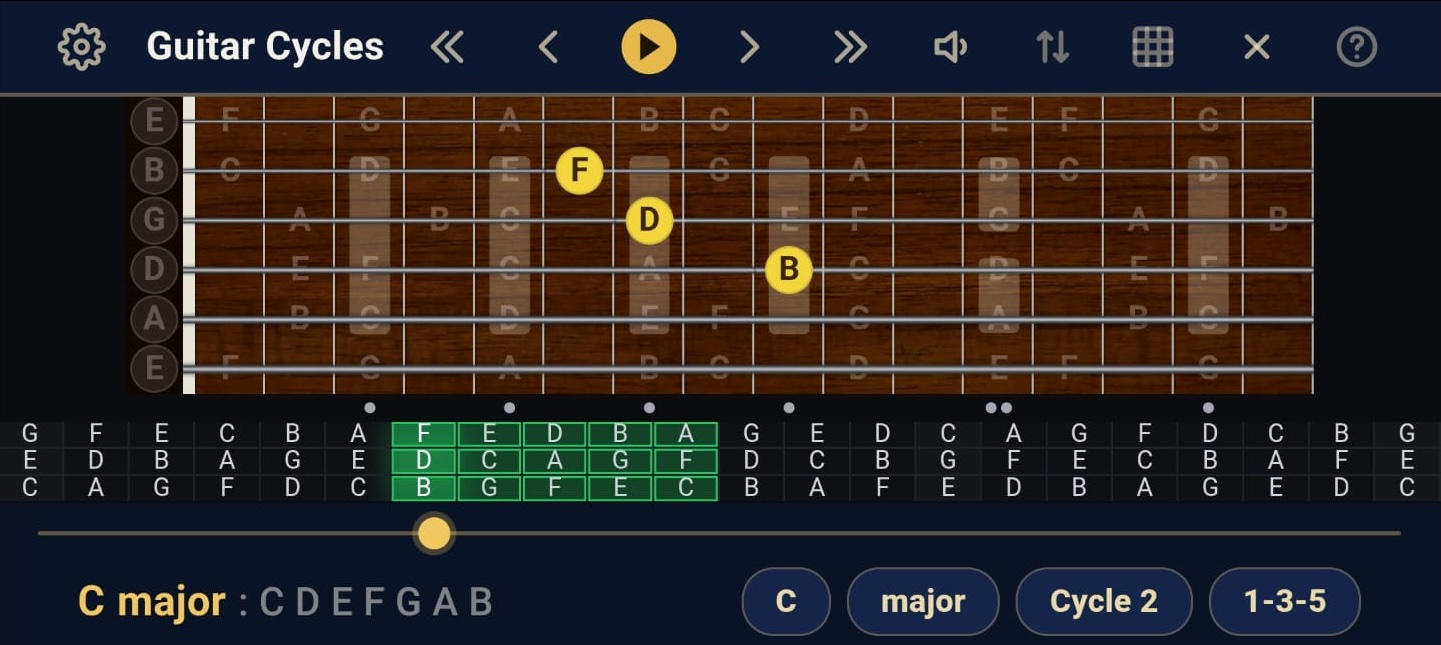
The step slider
Below the matrix, a slider sweeps across the same sequence: dragging it plays a short preview of each step you pass over, without the clicks or noise you'd get from triggering every single note, which makes it handy for quickly scanning a long cycle to find a particular spot.
Chapter 5: Settings
Tapping the gear icon in the top bar opens the Settings drawer, a panel that slides in over the main screen and holds every adjustment that doesn't need to be at your fingertips constantly. It's organized into three tabs: Harmony, Audio and Fretboard. We'll go through them one by one.
Rules that apply to every tab
A Reset defaults button at the top of the drawer restores key, scale and cycle size, along with the entire Audio and Fretboard tabs (instrument, Strum/Arpeggio, keep-screen-awake, tuning, fret range, both flips, overflow alert), to factory values in one tap. It deliberately leaves your active string set and voicing untouched, since those are usually a deliberate choice you don't want undone by accident.
Closing the drawer (the × button, or tapping outside it) is blocked if you currently have fewer than 3 strings active: you'll see a short alert asking you to select at least 3 before closing, since the app always needs a valid string set to keep working.
The Harmony tab
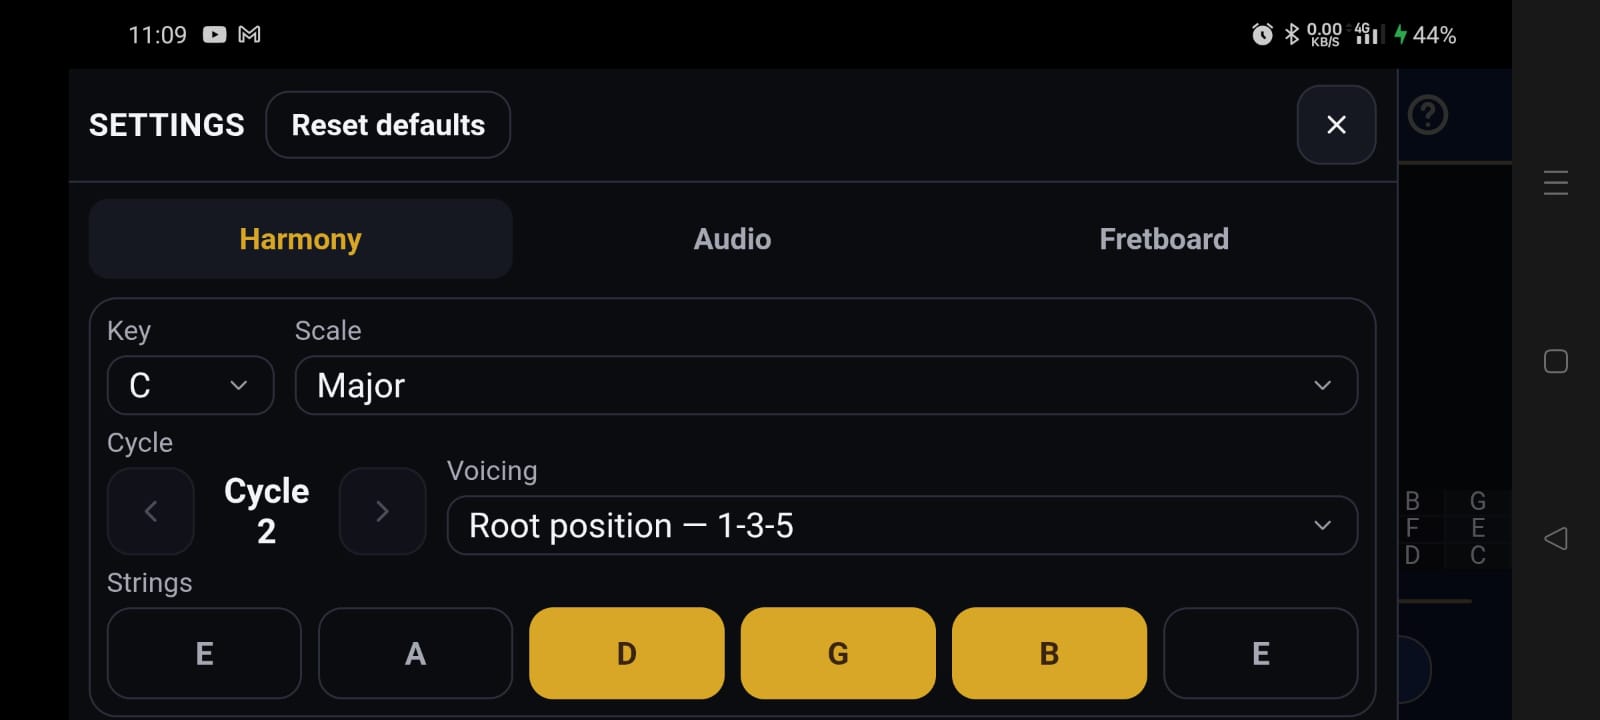
This tab covers the same musical choices as the four chips on the main screen (Chapter 2), plus one control that only lives here:
Key and Scale work exactly as they do from the chips: 21 key spellings, 4 scale types.
Cycle is presented as a stepper here instead of a list: a “◀ Cycle N ▶” control you tap left or right to move between sizes 1 through 7. Size 1 is labeled “Paral” instead of “Cycle 1”, short for parallel motion.
Voicing shows the same filtered list as the chip (triads or tetrads, depending on how many strings are active).
Strings is the one control unique to this tab: six tappable dots, one per string, letting you build your active string set directly rather than through the fretboard's nut-tapping gesture. It behaves identically either way: 3 or 4 active, and selecting a 5th automatically drops the lowest-pitched string already selected.
The Audio tab
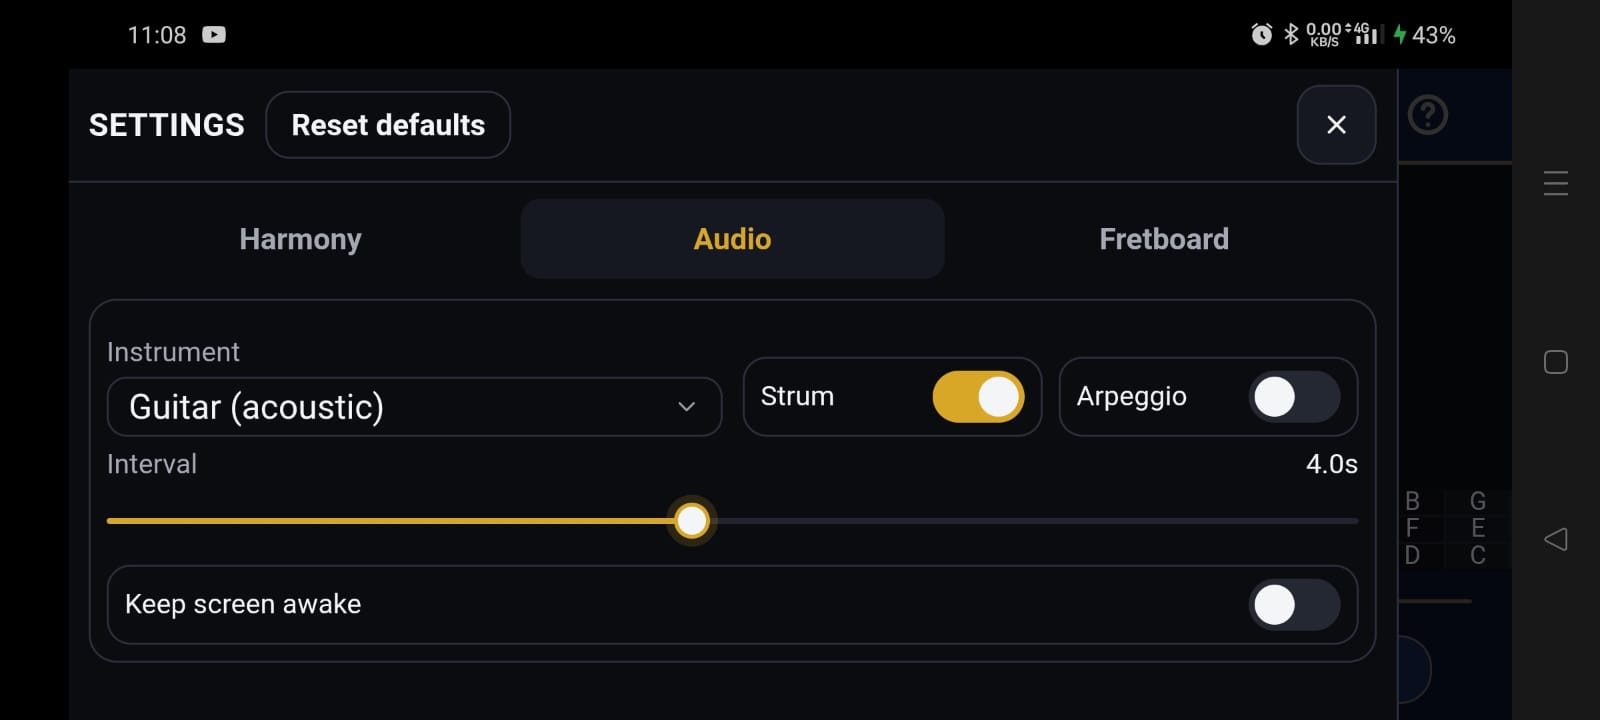
Instrument chooses the sound used for playback: Piano, Bassoon, Cello or Acoustic guitar.
Strum and Arpeggio are two alternative ways of playing a chord instead of striking all its notes at once: turning one on automatically turns the other off, since they're mutually exclusive. With both off, chords play as a single simultaneous block.
Interval is a slider controlling how much time passes between one cycle step and the next during playback, adjustable from 0.5 to 8 seconds in half-second increments: slower for really digesting a change, faster for building speed.
Keep screen awake stops your phone from locking or dimming the screen while the app is open, useful for longer practice sessions without touching it. Off by default.
The Fretboard tab
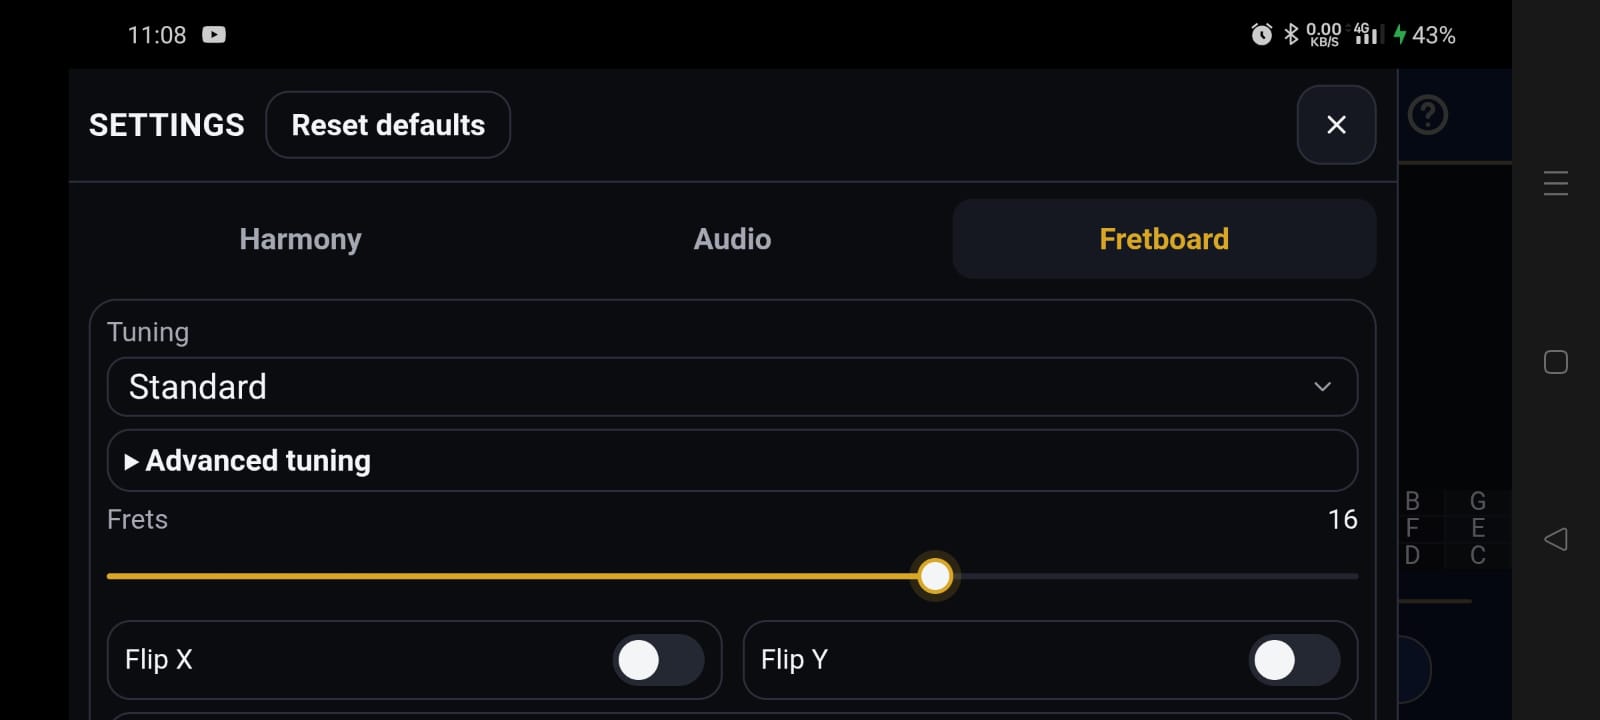
Tuning offers three named presets (Standard, Drop D and Open G) plus a Custom option.
Below it, an Advanced section (tap to expand) lets you set each of the six strings independently, note by note. Changing any single string switches the Tuning dropdown to Custom automatically; if your six custom notes happen to exactly match one of the named presets, it's detected and the dropdown switches back to that preset name.
Frets is a slider controlling how many frets are drawn on the fretboard, from 0 to 24 (16 by default), useful for narrowing the view if you only practice in the lower positions, or widening it for work further up the neck.
Flip X and Flip Y are checkbox equivalents to the fretboard swipe gestures described in Chapter 3, flipping left-to-right and top-to-bottom respectively. Whether you swipe on the fretboard directly or toggle these checkboxes, you're changing the exact same setting.
Overflow alert is on by default. When the current chord needs a fret beyond what Frets is currently showing, some notes can't be drawn on the fretboard, so a brief on-screen message reminds you to raise the Frets setting (or turn this alert off, if you'd rather not be reminded). It rechecks on every step, whether you move manually or during playback, and never lingers longer than your playback Interval, so it can't overlap the next chord change.
Chapter 6: Free vs Full Version
Guitar Cycles is fully usable without ever paying anything: the free version isn't a time-limited trial, and there's no countdown or expiration. What differs between free and full is the range of musical choices available, not whether the core tools work. Every gesture, screen and setting described in Chapters 2 through 5 exists in both versions; the free tier simply narrows a handful of musical parameters to a single, representative choice, so you can fully experience how the app works before deciding whether to unlock the rest.
What the free version includes
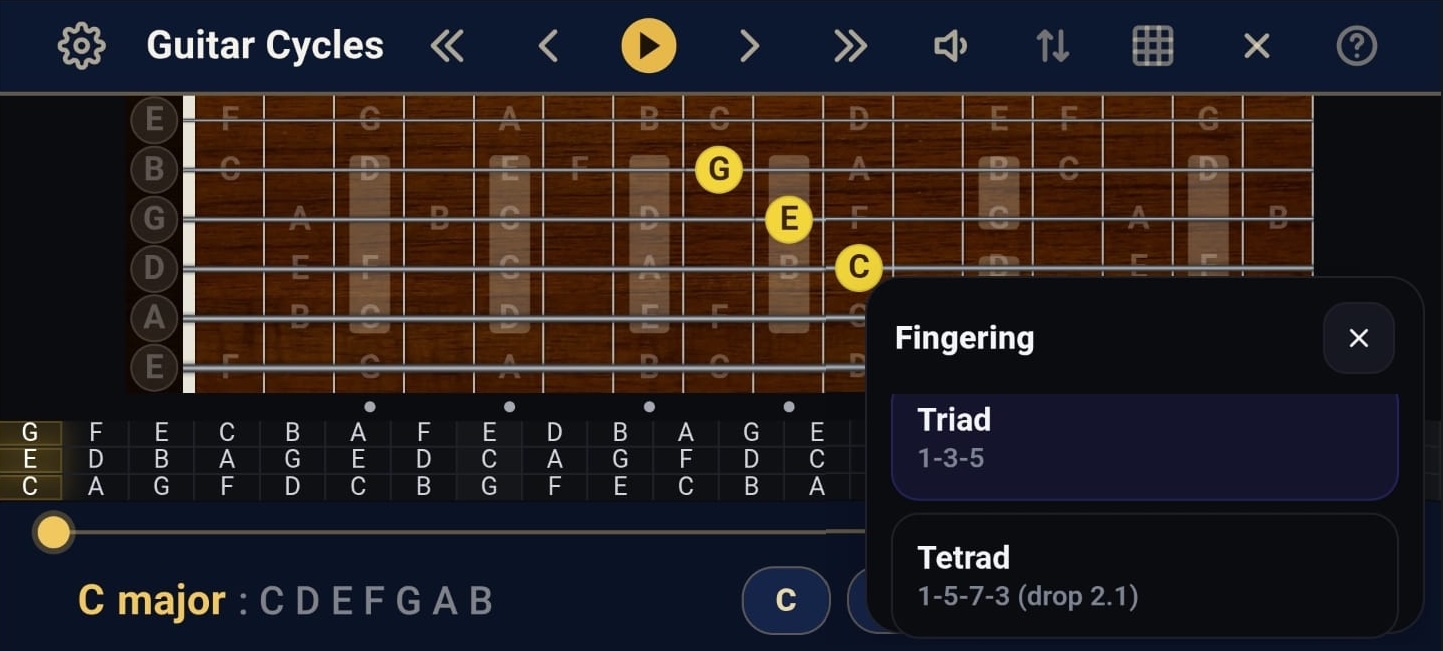
The free tier isn't four independently adjustable limits: it's exactly two fixed presets, and Cycle is always 2:
Triad preset: key of C major, Root position voicing (1-3-5), on strings D-G-B.
Tetrad preset: key of F major, Drop 2 voicing (1-5-7-3), on strings A-D-G-B.
Picking “Triad” or “Tetrad” from the Voicing chip (Chapter 2) applies the whole combination, key, scale, strings and voicing together, in a single tap; there's no way to mix a piece of one preset with a piece of the other on the free tier. If you reach a combination that doesn't match either preset exactly, whether by changing strings in Settings or otherwise, the app snaps it back to the closer of the two, with a brief on-screen notice.
Everything else (instrument choice, Strum/Arpeggio, playback interval, keep-screen-awake, tuning presets and custom tuning, fret range, and both fretboard flips) is fully available regardless of tier.
What unlocking Full adds
All 21 key spellings, not just C or F.
All 4 scale types: Major, Melodic minor, Harmonic minor, Harmonic major.
All 7 cycles, not just Cycle 2.
Every other selectable voicing in the catalog described in Chapter 2, not just the two free-tier presets.
Any 3- or 4-string set, contiguous or not, freely chosen from Settings instead of the two fixed sets above.
How you'll notice the difference
You don't need to remember this list while using the app: it's shown to you directly, though the exact mechanism depends on the control. On the Key, Scale and Cycle chips, and their equivalents in Settings, a locked option is shown dimmed rather than hidden; tapping it opens the purchase screen described in the next chapter. The Voicing chip works differently on the free tier: instead of dimming part of the catalog, it simply shows the two presets above. The Strings control in Settings (Chapter 5) isn't dimmed or blocked at all on the free tier; you can tap any combination freely, but closing the drawer with anything other than one of the two presets silently snaps it back to the nearest one, with a brief on-screen notice, rather than opening the purchase screen.
Chapter 7: Purchase and Restore
When a locked option opens the purchase screen, or when you tap “Unlock full version” from the Help panel, you'll see a single screen titled Guitar Cycles Full, subtitled “Unlock all keys, scales, and voicings”. It lists exactly what unlocking gives you: all 12 keys and their spellings, all four scale types, seventh-chord (tetrad) voicings and 4-string sets, and all seven chord cycles, the same list covered in Chapter 6.
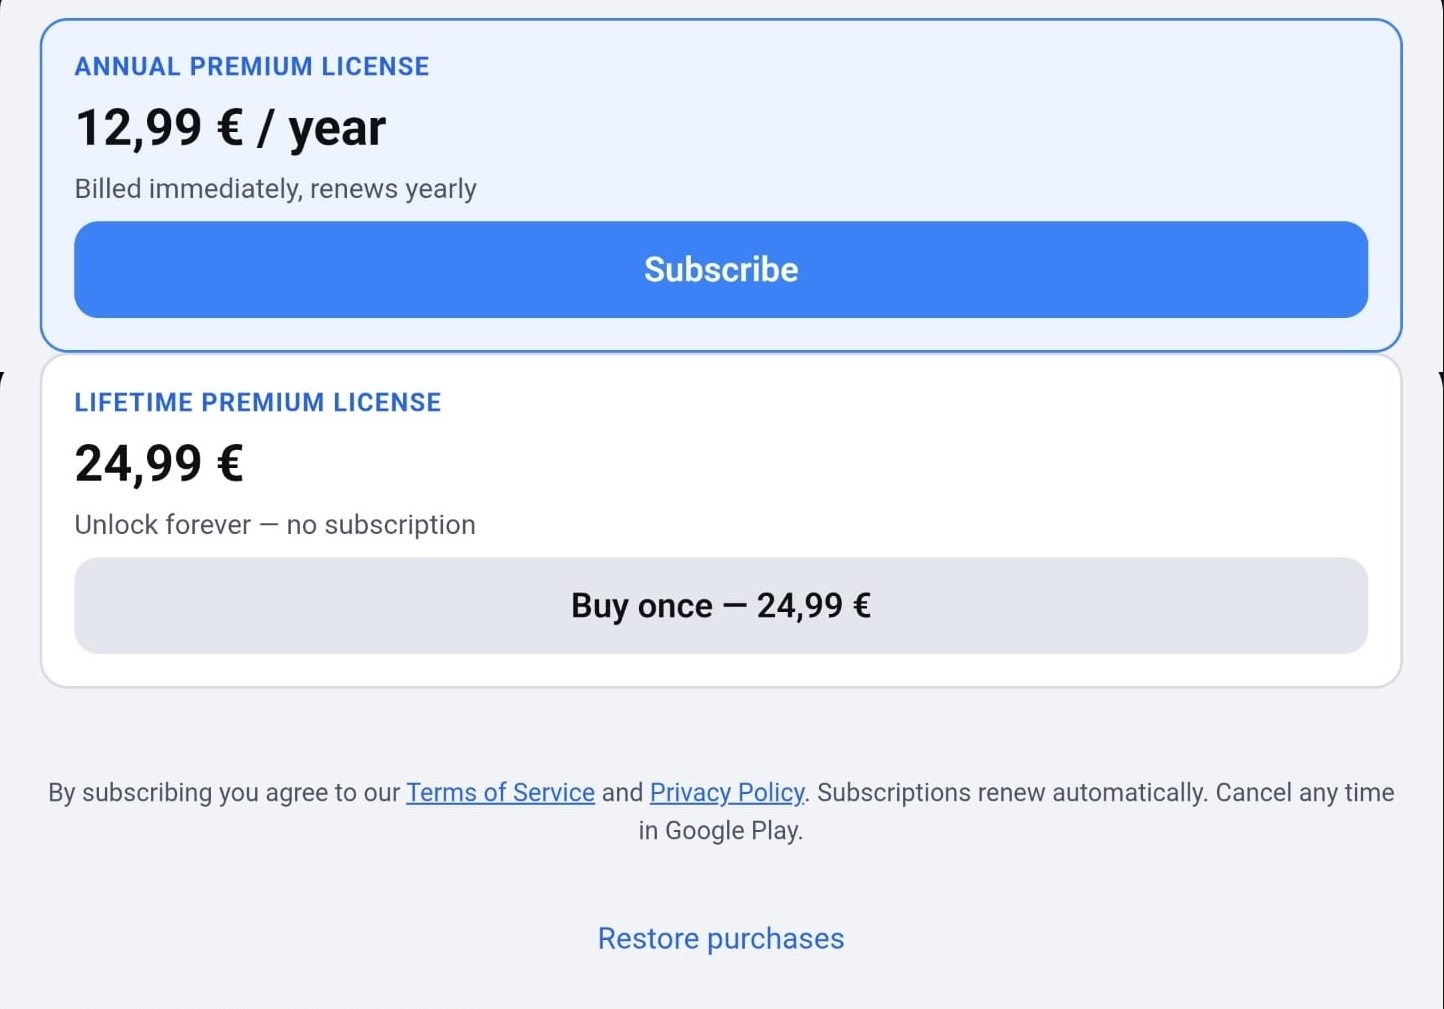
The two ways to unlock
Annual subscription (“Annual Premium License”): billed yearly and renews automatically each year.
Lifetime (“Lifetime Premium License”): a single one-time purchase. No recurring charge, ever.
The price shown for each option isn't fixed in the app: it's fetched live from the Google Play Store the moment the screen opens, so you'll always see the real, current price.
Restoring a purchase
If you reinstall the app or start using it on a new device with the same Google account, tap Restore purchases at the bottom of this screen to recheck the Play Store and reapply anything you already own. You shouldn't often need to do this manually, though: the app already rechecks your purchase status automatically and silently every time it resumes, so your access stays correct on its own in the vast majority of cases. The button exists mainly for the moment you first arrive on a new install and want confirmation right away.
Legal details and closing the screen
Below the two purchase options, a short line links to the Terms of Service and Privacy Policy, and notes that subscriptions renew automatically and can be cancelled any time from your Google Play account settings. You can leave this screen at any time without buying anything: tap the × in the corner, or tap anywhere outside the panel.
What happens after you buy
Once a purchase goes through, the app confirms it, updates your access, and briefly reloads so every screen reflects your new Full status immediately: the locked/dimmed options from Chapter 6 will be fully available from that point on.
Chapter 8: Help and Information
Wherever you are in the app, tapping the '?' icon in the top bar opens the Help panel, a two-tab reference you can consult any time without losing your place in what you were practicing.
The Help tab
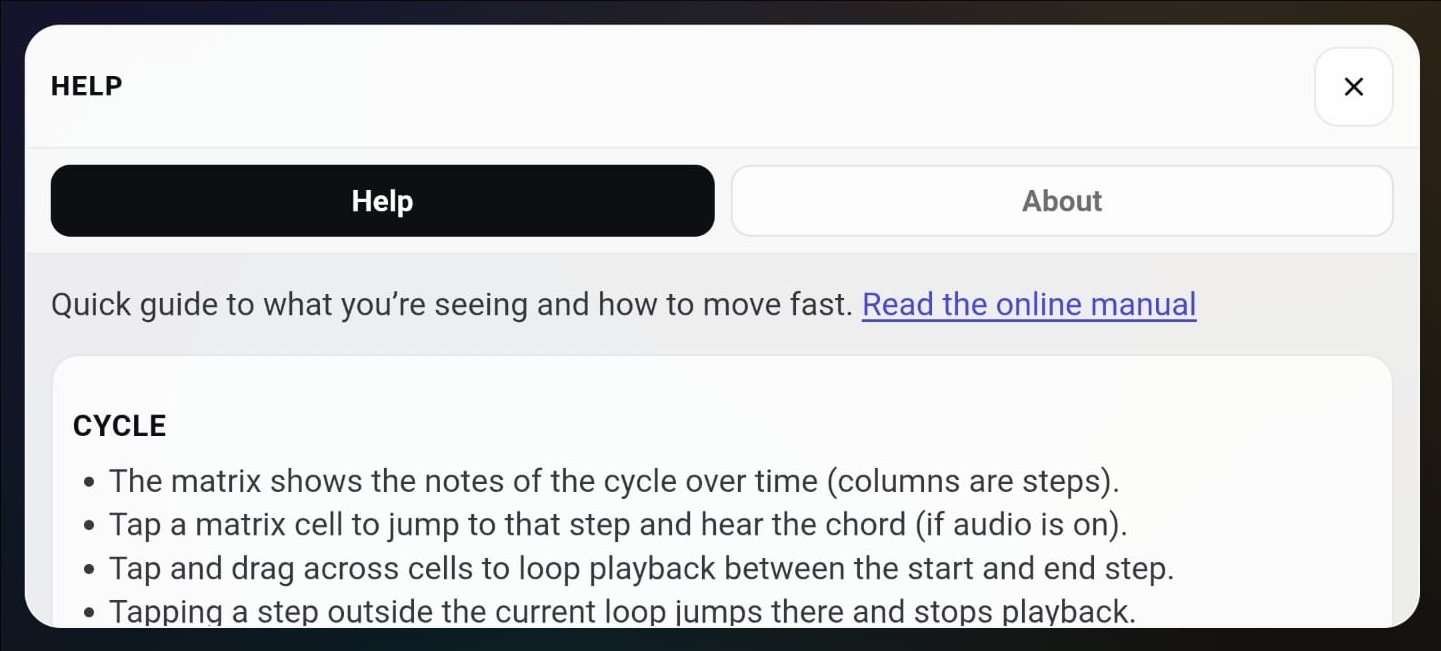
This tab is a condensed version of everything covered in Chapters 2 through 6 of this manual: a quick-reference rundown of the cycle matrix, voicings and string sets, the fretboard, the top-bar controls, audio, and exactly what's included free versus what Full unlocks. It's meant as a fast refresher once you already know the app, rather than a substitute for reading this manual start to finish the first time.
The About tab
Shows information about the app itself, rather than how to use it:
The current version number of the app.
Developer contact: an email address for support or feedback.
Copyright notice.
A short privacy statement: your settings are stored only on your device, no account is required to use the app, and this release includes no advertising or analytics of any kind.
A licenses section, in three parts: the app's own proprietary-license notice, an “Open-source libraries” list (audio and playback libraries, the Capacitor runtime, each with its own license type), and an “Audio samples” list crediting the instrument sample sources, followed by a “view full notices” link that opens the complete legal text for all of them.
An acknowledgments section, crediting the beta testers who helped shape the app.